Making hard cider at home offers you an affordable and rewarding experience. You can customize flavors to suit your taste, creating a beverage that reflects your preferences. The process becomes even more enjoyable with the right tools. A cider fermenter simplifies fermentation, ensuring consistent results and high-quality cider. By controlling factors like yeast selection and fermentation time, you can craft a drink with unique aromas and flavors. With cider’s growing popularity among younger consumers, now is the perfect time to explore this craft and create your own signature cider.
Essential Equipment for Making Hard Cider
To make hard cider at home, you need the right equipment to ensure a smooth and successful process. Having the proper tools not only simplifies the steps but also enhances the quality of your cider. Below, you’ll find an overview of essential equipment, including the role of a cider fermenter, other necessary tools, and optional items for advanced cider-making.
The Role of a Cider Fermenter
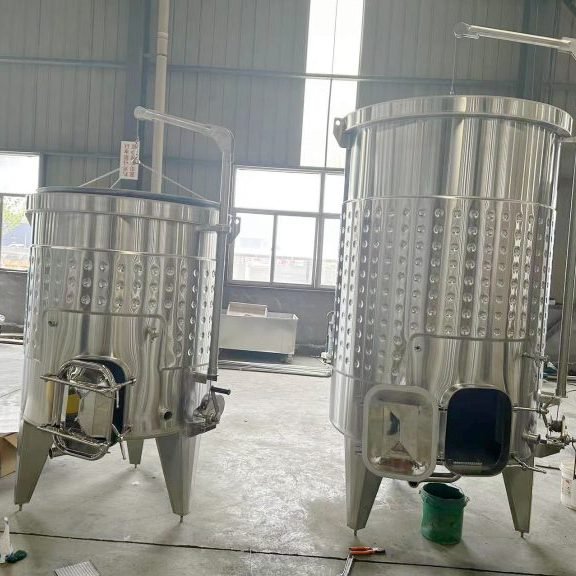
A cider fermenter is the cornerstone of the cider-making process. It provides a controlled environment where yeast converts the sugars in apple juice into alcohol and carbon dioxide. This tool ensures consistent temperatures, prevents contamination, and allows you to monitor fermentation progress effectively.
Modern fermenters, like the CHENMA Cider Fermentation Tank, are made from food-grade 304 stainless steel. These fermenters are designed to promote flavor development during the aging process. Their innovative features make them ideal for both beginners and experienced cider makers. By using a cider fermenter, you can achieve professional-quality results at home.
Fermenters often include airlocks to release carbon dioxide while keeping oxygen and contaminants out. This feature is crucial for maintaining the integrity of your cider. Whether you’re aiming for a dry or sweet cider, a fermenter helps you control the outcome with precision.
Other Necessary Tools
In addition to a cider fermenter, you’ll need several other tools to get started:
- Fermentation Containers: Options include carboys, plastic buckets, or stainless steel tanks. Each type has its advantages, but stainless steel offers durability and ease of cleaning.
- Rubber Stoppers and Airlocks: These components seal the fermenter while allowing gases to escape during fermentation.
- Hydrometer: This tool measures the specific gravity of your cider, helping you track sugar levels and estimate alcohol content.
- Bottles and Caps: Once fermentation is complete, you’ll need bottles to store your cider. Caps and a bottle capper ensure a secure seal.
These tools are essential for maintaining a clean and efficient cider-making process. They help you monitor progress and ensure your cider ferments properly.
Optional Tools for Advanced Cider-Making
If you’re ready to take your cider-making skills to the next level, consider investing in advanced tools:
- Temperature Control Systems: These systems allow you to maintain precise fermentation temperatures, which is especially important for achieving specific flavor profiles.
- Filtering Equipment: Filters remove sediment and clarify your cider, giving it a polished appearance.
- Carbonation Tools: For sparkling cider, you can use carbonation stones or priming sugar to add fizz before bottling.
- Custom Stainless Steel Tanks: Brands like Micet offer fermenters tailored to your needs, with features like professional installation and equipment layout services.
While these tools aren’t necessary for beginners, they can enhance your cider-making experience and help you experiment with more complex recipes.
“The right equipment transforms cider-making from a simple hobby into an art form. With tools like a cider fermenter, you can create a beverage that rivals commercial ciders in quality and taste.”
By equipping yourself with these tools, you’ll be well-prepared to embark on your cider-making journey. Start with the basics, and as you gain confidence, explore advanced options to refine your craft.
Ingredients for Hard Cider
When it comes to crafting hard cider, selecting the right ingredients is essential. The quality of your cider depends on the choices you make during this stage. From apple juice to yeast and optional additives, each component plays a vital role in shaping the flavor, aroma, and overall character of your cider.
Choosing the Right Apple Juice or Cider
The foundation of any hard cider lies in the apple juice or cider you use. For the best results, choose juice that is free from preservatives like potassium sorbate, as these can interfere with fermentation. Freshly pressed apple juice works well, but ensure it is pasteurized to avoid bacterial contamination. If you’re making cider from apples, consider using a mix of sweet and tart varieties to achieve a balanced flavor profile.
Certain apple varieties, such as McIntosh, Gala, or Granny Smith, are popular choices for cider-making. Research shows that fermentation methods can influence the cider’s characteristics. For example, pomace fermentation with McIntosh apples results in a darker color and fewer acids, while pectinase-treated mashes produce brighter cider with enhanced flavonols. Experimenting with different apple types allows you to create a cider that suits your taste preferences.
“A blend of apple varieties often yields the most complex and flavorful ciders. Don’t hesitate to mix and match to find your perfect combination.”
Selecting Yeast for Fermentation
Yeast is the driving force behind the fermentation process. It converts the sugars in apple juice into alcohol and carbon dioxide, transforming your juice into hard cider. The type of yeast you select significantly impacts the final product’s flavor, aroma, and alcohol content.
For beginners, cider-specific yeast strains are an excellent choice. These strains are designed to enhance the fruity character of your cider while ensuring a smooth fermentation process. Wine or champagne yeast can also be used to create a crisp and dry cider. If you’re feeling adventurous, natural yeast from the apples themselves can ferment your cider, but this method may lead to unpredictable results.
Scientific studies highlight the importance of yeast selection in cider-making. Co-culturing specific yeast strains can enhance the complexity of your cider, while proper starter strains help control the fermentation process. By choosing the right yeast, you can tailor your cider to your desired taste and style.
Optional Additives for Flavor and Sweetness
While apple juice and yeast are the core ingredients, optional additives can elevate your cider to the next level. These ingredients allow you to customize the flavor, sweetness, and appearance of your cider.
- Sugar: Adding sugar before fermentation increases the alcohol content. For a sweeter cider, use 1.5 pounds of sugar per gallon of juice. For a drier cider, 1 pound per gallon suffices.
- Spices: Cinnamon, cloves, or nutmeg can add warmth and depth to your cider, especially during colder months.
- Tannins: If your cider lacks body, adding tannins can provide structure and balance.
- Acid Blends: These enhance the tartness of your cider, making it more refreshing.
- Priming Sugar: To carbonate your cider, add a small amount of priming sugar before bottling.
Optional additives give you the freedom to experiment and create unique flavor profiles. Whether you prefer a dry, sparkling cider or a sweet, spiced one, these ingredients help you achieve your vision.
“Customizing your cider with additives is where creativity meets science. Small adjustments can make a big difference in the final product.”
By carefully selecting your ingredients, you set the stage for a successful home brewing experience. Each choice, from the apple juice to the yeast and optional additives, contributes to the unique character of your hard cider. Start with high-quality basics, and don’t be afraid to experiment as you refine your craft.
Beginner’s Guide to Preparing for Cider-Making
Before diving into the cider-making process, you must ensure that your equipment and ingredients are ready. Proper preparation sets the foundation for a successful fermentation and helps you avoid common pitfalls. This section will guide you through two critical steps: cleaning and sanitizing your equipment and adjusting sugar levels to achieve your desired alcohol content.
Cleaning and Sanitizing Equipment
Cleanliness is the cornerstone of successful cider-making. Any contamination can ruin your batch by introducing unwanted microorganisms that spoil the flavor or halt fermentation. Ancient brewers understood the importance of clean equipment long before modern science confirmed it. Today, we know that sanitization prevents microbial growth and ensures the microbiological quality of fermented beverages.
Follow these steps to clean and sanitize your equipment effectively:
- Wash Thoroughly: Use warm water and a mild detergent to remove dirt, residue, or leftover particles from previous batches. Pay special attention to hard-to-reach areas like corners and crevices.
- Rinse Completely: Ensure no soap or detergent remains on your equipment. Even small traces can interfere with fermentation.
- Sanitize: Apply a food-grade sanitizer to all surfaces that will come into contact with your cider. Popular options include iodine-based solutions or no-rinse sanitizers. Let the sanitizer air-dry for maximum effectiveness.
“Sanitization is crucial to give your cider the best chance to succeed. A clean environment allows the yeast to thrive without competition from harmful microbes.”
Remember to sanitize everything, including fermenters, airlocks, rubber stoppers, and even your hands. Consistency in this step ensures a smooth fermentation process and enhances the final product’s quality.
Adjusting Sugar Levels for Desired Alcohol Content
The sugar content in your apple juice directly impacts the alcohol level of your cider. Yeast consumes sugar during fermentation, converting it into alcohol and carbon dioxide. By adjusting the sugar levels, you can control the strength and sweetness of your cider.
Here’s how to adjust sugar levels effectively:
- Measure Initial Sugar Content: Use a hydrometer to check the specific gravity of your apple juice. This reading indicates the amount of sugar present.
- Add Sugar if Needed: For a dry cider, add 1 pound of sugar per gallon of juice. For a sweeter cider, increase this to 1.5 pounds per gallon. Stir thoroughly to dissolve the sugar evenly.
- Recheck Specific Gravity: After adding sugar, take another hydrometer reading to confirm the new sugar level. This step helps you estimate the potential alcohol content of your cider.
Temperature also plays a role in fermentation. Cooler temperatures produce cleaner and fresher flavors, while warmer conditions may lead to off-flavors. Monitor the temperature closely to maintain the desired characteristics of your cider.
“Adjusting sugar levels is a simple yet powerful way to customize your cider. With a hydrometer and a bit of patience, you can craft a drink that matches your preferences.”
By taking the time to gather and prepare equipment and ingredients properly, you set yourself up for success. These steps form the backbone of any beginner’s guide to making cider. With clean tools and balanced sugar levels, you’re ready to move forward with confidence and create a cider that reflects your unique taste.
Step-by-Step Guide to Using a Cider Fermenter
Setting Up the Cider Fermenter
To begin your cider-making journey, you must properly set up your cider fermenter. This step ensures a smooth fermentation process and sets the foundation for crafting high-quality hard cider. Follow these steps to prepare your fermenter:
- Clean and Sanitize: Before using the fermenter, clean it thoroughly with warm water and a mild detergent. Rinse it well to remove any residue. Apply a food-grade sanitizer to eliminate harmful microorganisms. Let the fermenter air-dry completely.
- Prepare Your Cider: Pour room-temperature apple cider or juice into the fermenter. Use a funnel to avoid spills and ensure a clean transfer. Make sure the cider is free from preservatives like potassium sorbate, as these can inhibit fermentation.
- Adjust Sugar Levels: If you want to control the alcohol content, measure the cider’s sugar levels with a hydrometer. Add sugar if needed, stirring until it dissolves completely.
- Pitch the Yeast: Sprinkle your chosen yeast directly into the fermenter. This step, known as “pitching the yeast,” activates the fermentation process. Ensure the cider’s temperature matches the yeast’s recommended range for optimal results.
- Seal the Fermenter: Attach an airlock and rubber stopper to the fermenter. The airlock allows carbon dioxide to escape while preventing oxygen and contaminants from entering.
Setting up the fermenter correctly ensures that the primary fermentation begins without issues. This preparation is crucial for achieving consistent and flavorful results.
Monitoring the Fermentation Process
Once you’ve set up the fermenter, the next step is to monitor the primary fermentation process. This stage is where the magic happens, as yeast converts sugars into alcohol and carbon dioxide. Here’s how to keep track of the process:
- Observe Activity in the Airlock: During fermentation, you’ll notice bubbles forming in the airlock. This bubbling indicates that the yeast is actively working. A steady stream of bubbles means the fermentation is progressing well.
- Check the Temperature: Maintain a consistent temperature within the yeast’s recommended range. Use a thermometer to monitor the fermenter’s environment. Cooler temperatures produce cleaner flavors, while warmer ones may lead to off-flavors.
- Measure Specific Gravity: Use a hydrometer to check the cider’s specific gravity periodically. This measurement helps you track the sugar levels and estimate the alcohol content. A significant drop in specific gravity indicates that fermentation is nearing completion.
- Avoid Opening the Fermenter: Resist the urge to open the fermenter during this stage. Exposure to oxygen can spoil your cider or introduce unwanted bacteria.
Monitoring the primary fermentation ensures that your cider develops the desired flavors and characteristics. Pay attention to these details to create a high-quality homebrew.
How Long to Ferment Hard Cider
The duration of the primary fermentation depends on several factors, including the yeast strain, sugar content, and temperature. On average, this stage takes about 1 to 3 weeks. Here’s a breakdown of what to expect:
- First Few Days: Fermentation activity will be most vigorous during the initial days. You’ll see rapid bubbling in the airlock as the yeast consumes sugars.
- Midway Point: After the first week, the bubbling will slow down. This indicates that the yeast has consumed most of the sugars and is transitioning to a slower phase.
- Final Stage: By the end of the second or third week, the bubbling may stop entirely. Use a hydrometer to confirm that the specific gravity has stabilized over several days. A stable reading means the primary fermentation is complete.
Once fermentation ends, you can decide whether to bottle your cider immediately or let it age for improved flavor. Aging allows the cider to develop complexity and balance, enhancing its overall quality.
“Patience is key when you ferment your cider. Allow the yeast to complete its work for the best results.”
By following this step-by-step guide, you can confidently use a cider fermenter to make hard cider at home. This process transforms simple apple juice into a delicious beverage that reflects your personal taste.
Bottling and Storing Your Hard Cider
Once fermentation is complete, bottling and storing your hard cider properly ensures its quality and longevity. This stage requires careful preparation and attention to detail. By following these steps, you can preserve the flavors you’ve worked hard to create and enjoy your cider at its best.
Preparing Bottles for Hard Cider
Clean and sanitized bottles are essential for bottling hard cider. Any contamination can spoil your cider or introduce off-flavors. Follow these steps to prepare your bottles:
- Choose the Right Bottles: Select glass bottles designed for carbonated beverages. Swing-top bottles or crown-cap bottles work well. Avoid using bottles not meant to handle pressure, as they may break during secondary fermentation.
- Wash Thoroughly: Rinse each bottle with warm water to remove dust or residue. Use a bottle brush to scrub the interior if needed.
- Sanitize Completely: Apply a food-grade sanitizer to all bottles. Submerge them in the solution or use a bottle rinser for even coverage. Let the bottles air-dry upside down on a clean rack.
“Properly sanitized bottles protect your cider from contamination and ensure a successful secondary fermentation.”
Don’t forget to sanitize any additional tools, such as funnels or siphoning equipment. Cleanliness at this stage guarantees the integrity of your cider.
Safely Bottling and Sealing Your Cider
Bottling your cider involves transferring it from the fermenter to the prepared bottles. This step requires precision to avoid introducing oxygen, which can spoil the cider. Here’s how to bottle safely:
- Siphon Carefully: Use a siphon or racking cane to transfer the cider. Place the fermenter on a raised surface and let gravity assist the process. Avoid disturbing the sediment at the bottom of the fermenter.
- Add Priming Sugar: For sparkling cider, dissolve priming sugar in a small amount of water and add it to the cider before bottling. This sugar fuels the secondary fermentation, creating carbonation. Use about 1 ounce of sugar per gallon of cider.
- Fill Bottles: Leave about an inch of headspace at the top of each bottle. This space allows for pressure buildup during secondary fermentation.
- Seal Securely: Cap the bottles using a bottle capper or secure the swing tops. Ensure a tight seal to prevent leaks and maintain carbonation.
“Adding priming sugar before bottling initiates secondary fermentation, giving your cider a delightful sparkle.”
Label your bottles with the bottling date and any notes about the batch. This practice helps you track aging and identify your cider later.
Storing Bottled Cider for Best Results
Proper storage allows your cider to mature and develop its full flavor. The conditions you provide during this stage significantly impact the final product. Follow these guidelines for optimal storage:
- Temperature Control: Store the bottles in a cool, dark place. A temperature range of 50–60°F works well for secondary fermentation and aging. Avoid exposing the bottles to direct sunlight or extreme heat.
- Monitor Carbonation: Check the bottles after one to two weeks. Gently open one to test the carbonation level. If it’s too low, allow more time for secondary fermentation.
- Aging for Flavor: While you can enjoy your cider after carbonation, aging enhances its complexity. Dry ciders benefit from aging for several months, while sweeter ciders may require less time.
“Patience during storage rewards you with a cider that boasts balanced flavors and refined character.”
Store the bottles upright to keep the seals intact and prevent leaks. Once opened, refrigerate the cider and consume it within a few days for the best taste.
By preparing your bottles, bottling carefully, and storing under the right conditions, you ensure that your hard cider reaches its full potential. These steps preserve the quality of your cider and allow you to enjoy the fruits of your labor.
Customizing the Flavor of Your Hard Cider
Customizing your hard cider allows you to create a drink that reflects your personal taste and creativity. By experimenting with spices, sweetness levels, carbonation, and unique blends, you can elevate your cider-making experience. This section explores how you can add your own twist to hard cider, making it truly one-of-a-kind.
Adding Spices and Flavorings
Adding spices and flavorings is one of the simplest ways to enhance your cider. These ingredients can transform a basic cider into a seasonal favorite or a bold, aromatic beverage. Here’s how you can incorporate them:
- Warm Spices: Add cinnamon sticks, cloves, or nutmeg for a cozy, autumnal flavor. These spices pair well with the natural sweetness of apples and are perfect for colder months.
- Citrus Zest: Use orange or lemon zest to brighten the cider’s taste. The citrus notes add a refreshing twist, especially for summer ciders.
- Herbs: Experiment with fresh herbs like rosemary or thyme. These add a subtle, earthy complexity to your cider.
- Vanilla or Ginger: Vanilla beans or fresh ginger slices can provide a smooth or spicy kick, depending on your preference.
To infuse these flavors, place the spices or flavorings in a muslin bag and steep them in your cider during fermentation or aging. Taste the cider periodically to ensure the flavors don’t overpower the drink.
“Adding flavor to hard cider is an art. A pinch of spice or a hint of citrus can turn a simple cider into a masterpiece.”
Adjusting Sweetness and Carbonation Levels
Sweetness and carbonation play a significant role in determining the overall taste of your cider. Adjusting these elements allows you to fine-tune your drink to match your preferences.
Sweetness:
- To make your cider sweeter, add non-fermentable sweeteners like stevia or lactose after fermentation. These won’t restart the fermentation process.
- For a natural sweetness, back-sweeten your cider with apple juice or concentrate. Pasteurize the cider to prevent further fermentation.
- If you prefer a dry cider, avoid adding extra sugar. Let the yeast consume all the natural sugars during fermentation.
Carbonation:
- For sparkling cider, add priming sugar before bottling. This triggers a secondary fermentation, creating natural carbonation.
- If you want precise control, use a carbonation stone or CO2 tank to carbonate your cider artificially.
- For still cider, skip the carbonation step entirely. This style highlights the cider’s pure flavors without the distraction of bubbles.
“The balance of sweetness and carbonation defines the cider’s character. Small adjustments can make a big difference in the final taste.”
Experimenting with Unique Cider Blends
Blending different ciders or juices opens up endless possibilities for creating unique flavors. This approach allows you to combine the best qualities of various apple varieties or even mix in other fruits.
- Apple Blends: Mix sweet apples like Fuji with tart ones like Granny Smith. This creates a balanced cider with depth and complexity.
- Fruit Additions: Incorporate fruits like pears, cherries, or berries. These add vibrant colors and complementary flavors to your cider.
- Barrel Aging: Age your cider in oak barrels or add oak chips for a rich, woody flavor. This technique mimics traditional cider-making methods.
- Co-Fermentation: Ferment your cider with other beverages like mead or beer. This produces hybrid drinks with unique taste profiles.
Blending requires experimentation. Start with small batches and take detailed notes on your process. Over time, you’ll discover combinations that suit your palate.
“Making cider is about creativity. Blending juices and experimenting with flavors lets you craft a drink that’s truly your own.”
Customizing your cider transforms the process from simple cider making into a creative journey. By adding spices, adjusting sweetness and carbonation, and experimenting with blends, you can craft a cider that stands out. Each batch becomes an opportunity to explore new tastes and refine your skills.
Troubleshooting Common Issues in Cider-Making
Even with careful preparation, challenges can arise during the cider-making process. Understanding common problems and their solutions helps you avoid frustration and ensures your cider turns out as planned. This section addresses fermentation issues, bottling and storage challenges, and how to fix off-flavors in your hard cider.
Fermentation Problems and Solutions
Fermentation is the heart of cider-making, but it doesn’t always go smoothly. If you encounter issues, don’t panic. Most problems have straightforward solutions.
Fermentation Won’t Start: If your cider shows no signs of fermentation (no bubbling in the airlock), check the temperature. Yeast thrives between 60°F and 75°F. If the cider is too cold, move it to a warmer spot. Ensure you used a suitable cider yeast. Some yeast strains take longer to activate, so give it 24–48 hours before taking further action. If nothing changes, pitch a fresh batch of yeast.
Slow or Stuck Fermentation: If fermentation starts but slows down or stops prematurely, measure the specific gravity with a hydrometer. High sugar levels might overwhelm the yeast. Dilute the cider slightly with water to lower the sugar concentration. Check for contamination or improper sanitization, as these can inhibit yeast activity. Adding yeast nutrients can also help revive fermentation.
Airlock Issues: Forgetting to add water to the airlock is a common mistake. Without water, the airlock can’t prevent oxygen or contaminants from entering. If this happens, sanitize the airlock immediately, refill it with water, and reattach it. Your cider is likely still safe if you act quickly.
“Fermentation problems often stem from temperature, yeast selection, or sanitization. Addressing these factors ensures a smooth process.”
By staying vigilant and addressing these issues promptly, you can keep your fermentation on track.
Bottling and Storage Challenges
Bottling and storing cider require precision. Mistakes at this stage can compromise your hard work. Here’s how to tackle common challenges:
Overcarbonation: If your bottles become overcarbonated, they may explode. This usually happens when too much priming sugar is added before bottling. To prevent this, measure priming sugar carefully. If you suspect overcarbonation, refrigerate the bottles immediately to slow fermentation and release pressure safely.
Flat Cider: If your cider lacks carbonation, the yeast may not have enough sugar to create fizz. Double-check your priming sugar measurements. Ensure the bottles are sealed tightly to trap carbon dioxide. If the problem persists, consider using carbonation drops for more precise control.
Leaking Bottles: Improperly sealed bottles can lead to leaks or spoilage. Inspect your caps or swing tops for damage. Use a reliable bottle capper to ensure a secure seal. Always test a few bottles before storing the entire batch.
Storage Conditions: Storing cider in a warm or sunny location can degrade its quality. Keep bottles in a cool, dark place to preserve flavor and carbonation. Monitor the temperature to avoid fluctuations that could affect aging.
“Proper bottling and storage techniques protect your cider’s integrity and ensure it matures gracefully.”
Attention to detail during bottling and storage safeguards your cider’s quality and longevity.
Fixing Off-Flavors in Hard Cider
Off-flavors can ruin an otherwise perfect batch of cider. Identifying the cause helps you correct the issue and prevent it in the future.
Sulfur Smell: A rotten egg smell often indicates stressed yeast. This can happen if the cider lacks nutrients or if fermentation occurs at an improper temperature. Aerate the cider gently to release the sulfur compounds. Adding yeast nutrients during fermentation can prevent this issue.
Vinegar Taste: A sour, vinegary flavor suggests acetic acid bacteria contamination. This occurs when oxygen enters the fermenter. Unfortunately, vinegar-like cider is difficult to salvage. Focus on prevention by ensuring airtight seals and proper sanitization.
Metallic Taste: Metallic flavors usually result from contact with non-food-grade equipment. Always use stainless steel or food-safe materials. If the taste is mild, aging the cider may reduce its intensity.
Flat or Bland Flavor: If your cider tastes dull, it may lack acidity or tannins. Add malic acid or tannin powder to enhance the flavor. Aging the cider can also improve complexity and balance.
“Off-flavors often stem from fermentation stress, contamination, or equipment issues. Identifying the root cause helps you refine your process.”
By addressing off-flavors, you can rescue your cider or improve future batches.
Troubleshooting is an essential skill for any cider maker. By understanding common issues and their solutions, you can overcome challenges and produce high-quality cider. Stay patient, learn from each batch, and enjoy the journey of crafting your perfect hard cider.
Tips for Success in Making Hard Cider
Keeping a Cider-Making Journal
Documenting your cider-making journey can significantly improve your results over time. A cider-making journal helps you track each batch, identify what works, and refine your techniques. By recording details, you create a valuable resource for future experiments.
Here’s what to include in your journal:
- Ingredients: Note the type of apple juice, yeast strain, and any additives you use. If you blend apple varieties, list them and their proportions.
- Measurements: Record the initial and final specific gravity readings. These numbers help you calculate alcohol content and monitor fermentation progress.
- Process Details: Write down the fermentation temperature, duration, and any adjustments you make, such as adding sugar or spices.
- Observations: Describe the cider’s aroma, flavor, and appearance at different stages. Include notes on carbonation levels if applicable.
- Lessons Learned: Reflect on what went well and what could improve. For example, you might discover that adding crab apples enhances tannins and balances flavors.
“A cider-making journal transforms trial and error into a structured learning process. Each entry brings you closer to mastering the craft.”
Keeping detailed records allows you to replicate successful batches and avoid repeating mistakes. Over time, your journal becomes a personalized guide to creating exceptional cider.
Patience and Practice for Better Results
Patience plays a crucial role in making hard cider. Fermentation takes time, often lasting 1–2 weeks, and aging can extend the process by several months. Rushing these steps can compromise the flavor and quality of your cider.
Here’s why patience matters:
- Fermentation Completeness: Yeast needs time to convert sugars into alcohol. Prematurely bottling your cider can result in incomplete fermentation or overcarbonation.
- Flavor Development: Aging allows the cider’s flavors to mature and harmonize. High-acidity ciders benefit from extended aging, while fruity aromas may require less time.
- Problem Solving: If issues arise, such as slow fermentation, patience gives you the opportunity to troubleshoot and correct them without discarding the batch.
“Patience isn’t just a virtue; it’s an ingredient in every great cider. Let the process unfold naturally for the best results.”
Practice also improves your skills. Each batch teaches you something new, whether it’s how to adjust sugar levels or experiment with unique blends. Over time, you’ll develop a deeper understanding of the craft and produce consistently better cider.
Encouragement to Experiment and Refine Techniques
Cider-making thrives on creativity. Experimenting with flavors, techniques, and ingredients allows you to craft a cider that reflects your personal taste. Don’t hesitate to step outside your comfort zone and try something new.
Here are some ways to experiment:
- Blend Apple Varieties: Mixing sweet and tart apples often yields more complex flavors. Adding crab apples can introduce tannins that round out the cider’s profile.
- Incorporate Spices or Fruits: Enhance your cider with cinnamon, ginger, or citrus zest. Fruits like cherries or pears can add vibrant colors and complementary flavors.
- Adjust Sweetness and Carbonation: Play with sugar levels to create a dry or sweet cider. Experiment with carbonation methods to achieve the perfect fizz.
- Test Aging Techniques: Age your cider in oak barrels or with wood chips for a rich, woody character. Compare aged and fresh ciders to understand how time influences flavor.
“Experimentation turns cider-making into an art form. Each batch is an opportunity to explore new possibilities and refine your craft.”
Celebrate your successes and learn from your challenges. The more you experiment, the more confident and skilled you’ll become. Over time, you’ll develop a signature style that sets your cider apart.
Why Choose a Chenma Cider Fermenter?
When it comes to crafting high-quality hard cider, the equipment you use plays a pivotal role. A reliable fermenter ensures that every stage of the cider-making process, from primary fermentation to aging, is efficient and consistent. Chenma Cider Fermenters stand out as an excellent choice for both beginners and seasoned cider makers. Their innovative features, user-friendly design, and commitment to quality make them a valuable addition to your cider-making journey.
Features of Chenma Stainless Steel Fermenters
Chenma Cider Fermenters are crafted with precision to meet the needs of cider enthusiasts. These fermenters are made from food-grade 304 stainless steel, a material known for its durability and resistance to corrosion. This ensures that your fermenter remains in excellent condition even after repeated use. The smooth surface of stainless steel simplifies cleaning, saving you time and effort while maintaining hygiene.
Key features of Chenma fermenters include:
- Advanced Design: Chenma fermenters are designed to support all stages of cider production, including primary fermentation, secondary fermentation, and aging. This versatility allows you to create hard cider with complex flavors and aromas.
- Temperature Control: Maintaining the right temperature is crucial for fermentation. Chenma fermenters are equipped with features that help regulate temperature, ensuring optimal conditions for yeast activity.
- Airlock Integration: The fermenters come with airlocks that release carbon dioxide while preventing oxygen and contaminants from entering. This feature protects the integrity of your hard cider.
- Durability: The robust construction of Chenma fermenters ensures they can withstand the demands of both small-scale and large-scale cider production.
These features make Chenma fermenters a dependable choice for achieving consistent results in your cider-making process.
“The quality of your equipment directly impacts the quality of your cider. Chenma fermenters provide the reliability and functionality you need to produce exceptional hard cider.”
Benefits of Using Chenma Equipment for Hard Cider
Choosing Chenma Cider Fermenters offers several advantages that enhance your cider-making experience. These benefits cater to both beginners who are just starting and advanced users looking to refine their craft.
- Ease of Use: Chenma fermenters are designed with user-friendliness in mind. Their intuitive features make them accessible to beginners, while their advanced capabilities appeal to experienced cider makers.
- Consistent Results: The fermenters provide a controlled environment for fermentation, ensuring that your hard cider develops the desired flavors and characteristics every time.
- Hygiene and Safety: The use of food-grade stainless steel ensures that your cider remains free from contamination. The easy-to-clean surface further promotes a sanitary brewing process.
- Versatility: Whether you’re making a dry cider or experimenting with sweeter blends, Chenma fermenters adapt to your needs. Their design supports various fermentation styles and techniques.
- Durability and Longevity: Investing in a Chenma fermenter means you’re choosing equipment built to last. The high-quality materials and craftsmanship ensure that your fermenter remains a reliable tool for years to come.
These benefits make Chenma fermenters a worthwhile investment for anyone passionate about making hard cider at home.
How Chenma Supports Beginner and Advanced Cider Makers
Chenma goes beyond providing high-quality fermenters. The company is dedicated to supporting cider makers at every skill level, ensuring that you have the tools and knowledge needed to succeed.
- Beginner-Friendly Features: If you’re new to cider making, Chenma fermenters simplify the process. The clear instructions and user-friendly design help you navigate each step with confidence.
- Advanced Capabilities: For experienced cider makers, Chenma fermenters offer advanced features like precise temperature control and compatibility with additional equipment. These capabilities allow you to experiment with complex recipes and techniques.
- Technical Support: Chenma provides technical assistance to help you get the most out of your fermenter. Whether you have questions about setup or need guidance on fermentation, their team is ready to assist.
- Customization Options: Chenma understands that every cider maker has unique needs. Their fermenters can be customized to suit your specific requirements, ensuring that you have the perfect setup for your cider-making goals.
By choosing Chenma, you gain access to a wealth of resources and expertise that enhance your cider-making journey. Whether you’re crafting your first batch or perfecting your signature blend, Chenma supports you every step of the way.
“Chenma doesn’t just sell fermenters; they empower cider makers to achieve their best results. Their commitment to quality and customer support sets them apart in the industry.”
Making cider at home is a rewarding journey that combines creativity and craftsmanship. By following the step-by-step process, you can transform simple apple juice into a flavorful beverage tailored to your taste. Using a cider fermenter, like the CHENMA fermenter, ensures consistent results by providing a controlled environment for fermentation and simplifying sediment removal. This tool helps you maintain clarity and quality in every batch. Experiment with ingredients and supplies to craft unique blends and flavors. Enjoy the process, share your creations, and take pride in making cider from scratch that reflects your personal style.
FAQ
What is the ideal temperature for fermenting hard cider?
The ideal fermentation temperature for hard cider ranges between 15°C (59°F) and 20°C (68°F). At this range, yeast retains the fruity flavors that enhance your cider’s taste. Andrew Lea, author of Craft Cider Making, recommends cooler temperatures, around 15°C or lower, to preserve these aromas. However, if the temperature drops below 10°C (50°F), some cultured yeasts may stop fermenting. On the other hand, fermenting above 20°C (68°F) can lead to undesirable flavors, such as a “pear drop” taste, which may ruin your batch. Always aim for a stable temperature to avoid sudden fluctuations that could disrupt fermentation.
What type of yeast should I use for cider-making?
Selecting the right yeast is crucial for crafting flavorful cider. Cider-specific yeast strains are ideal because they enhance the fruity character of your cider. Wine yeasts, known for retaining fruity aromas, also work well. For example, microbial starters like Oenococcus oeni can play a significant role in controlling fermentation and improving the final product’s quality. If you’re new to cider-making, start with a cider yeast designed for beginners to ensure a smooth fermentation process.
How do I clean and sanitize my equipment effectively?
Cleaning and sanitizing your equipment is essential to prevent contamination and ensure a successful fermentation. Start by washing all tools with warm water and mild detergent to remove dirt and residue. Rinse thoroughly to eliminate any soap traces. Then, apply a food-grade sanitizer to all surfaces that will come into contact with your cider. Let the equipment air-dry completely before use. This step protects your cider from harmful microorganisms and ensures the yeast can work without interference.
Pro Tip: Always sanitize not just your fermenter but also airlocks, rubber stoppers, and even your hands to maintain a sterile environment.
Can I use any type of apple for making cider?
While you can use most apple varieties, certain cultivars are better suited for cider-making. McIntosh apples, for instance, are popular due to their sweet-tart flavor and aromas of honey, fruit, and spice. These apples are widely grown in Canada, the United States, and Eastern Europe. For a balanced cider, consider blending sweet apples like Fuji with tart ones like Granny Smith. Experimenting with different apple types allows you to create unique flavor profiles.
How can I maximize the fruity aromas in my cider?
Your choice of yeast plays a significant role in retaining fruity aromas. Many wine yeasts are specifically selected for this trait, making them a great option for cider-making. Additionally, fermenting at cooler temperatures (around 15°C or 59°F) helps preserve these delicate flavors. Avoid fermenting at high temperatures, as this can strip away the fruity notes and result in off-flavors.
What should I do if fermentation doesn’t start?
If fermentation doesn’t begin, check the temperature of your cider. Yeast thrives between 60°F and 75°F. If the cider is too cold, move it to a warmer spot. Ensure you’ve used a suitable cider yeast and given it enough time to activate, as some strains take up to 48 hours to show activity. If there’s still no sign of fermentation, pitch a fresh batch of yeast to restart the process.
How do I adjust the sweetness of my cider?
To make your cider sweeter, add non-fermentable sweeteners like stevia or lactose after fermentation. These won’t restart fermentation. Alternatively, back-sweeten your cider with apple juice or concentrate, but pasteurize it to prevent further fermentation. For a dry cider, let the yeast consume all the natural sugars during fermentation without adding extra sugar.
What causes off-flavors in cider, and how can I fix them?
Off-flavors can result from various issues:
- Sulfur Smell: Often caused by stressed yeast. Aerate the cider gently to release sulfur compounds and add yeast nutrients during fermentation.
- Vinegar Taste: Indicates acetic acid bacteria contamination, usually due to oxygen exposure. Prevent this by ensuring airtight seals and proper sanitization.
- Metallic Taste: Results from contact with non-food-grade equipment. Use stainless steel or food-safe materials to avoid this issue.
If the off-flavor is mild, aging the cider may help balance and improve its taste.
How long should I age my cider?
The aging time depends on your cider’s characteristics. High-acidity ciders benefit from aging for over eight months, while those with fruity aromas may require less than four months. Aging allows flavors to mature and harmonize, resulting in a more complex and balanced cider. Store your cider in a cool, dark place during this period for the best results.
Can I experiment with other fruits or spices in my cider?
Absolutely! Adding fruits like cherries, pears, or berries can create vibrant colors and unique flavors. Spices such as cinnamon, cloves, or nutmeg add warmth and depth, especially for seasonal ciders. To infuse these flavors, steep the fruits or spices in your cider during fermentation or aging. Taste periodically to ensure the flavors don’t overpower the cider.
“Experimentation is the heart of cider-making. Each addition brings a new dimension to your craft.”
These FAQs address common concerns and provide actionable tips to help you succeed in your cider-making journey. With the right knowledge and tools, you can craft a cider that reflects your personal taste and creativity.