Making cider at home offers a fun and satisfying way to enjoy a handcrafted beverage. With a cider fermentation kit, you can skip the complicated steps and dive right into the process, even if you’re a beginner. The key to great cider starts when you select the apples, ensuring they’re fresh and free of preservatives. Cider-making has grown in popularity, with over 1.1 million new consumers in the UK alone exploring this drink in 2020. Why not join the trend and create your own delicious cider?
What You Need to Get Started with a Cider Fermentation Kit
Before diving into the cider-making process, you need the right tools and ingredients. A well-prepared setup ensures a smooth experience and helps you create high-quality cider. Let’s break down what you’ll need.
Essential Equipment for Cider-Making
To start making cider from apples, gather some basic yet essential equipment. These tools simplify the process and ensure your cider turns out delicious.
- Fermentation vessel (e.g., glass carboy or plastic bucket): This is where the magic happens. A fermentation vessel holds your apple juice as it transforms into cider. Glass carboys are popular for their durability and transparency, letting you monitor the process.
- Airlock and stopper: These small but crucial tools allow carbon dioxide to escape during fermentation while keeping oxygen and contaminants out. They help maintain a clean environment for your cider.
- Hydrometer for measuring sugar levels: A hydrometer measures the sugar content in your apple juice. This tool helps you track fermentation progress and estimate the alcohol content of your cider.
- Bottles, caps, and a bottle capper: Once fermentation is complete, you’ll need bottles to store your cider. Caps and a capper seal the bottles, preserving freshness and carbonation.
- Cleaning and sanitizing supplies: Cleanliness is key in cider-making. Use sanitizers to clean all equipment before use. This step prevents contamination and ensures your cider tastes great.
“Choosing the right equipment is essential to ensure the quality and flavor of your cider.” – Revolution Fermentation
Ingredients for Making Cider from Apples
The ingredients you choose play a big role in the flavor and quality of your cider. Here’s what you’ll need:
- Fresh apple juice or cider (without preservatives): Start with high-quality apple juice or cider. Avoid products with preservatives, as they can interfere with fermentation. Fresh, unpasteurized juice works best for retaining natural flavors.
- Yeast (cider-specific or wine yeast): Yeast is the powerhouse behind fermentation. Cider-specific yeast is ideal, but wine yeast also works well. It converts the sugars in apple juice into alcohol, giving your cider its kick.
- Sugar (optional, for sweetness or carbonation): Adding sugar is optional. It can enhance sweetness or create natural carbonation during bottling. Experiment to find the balance that suits your taste.
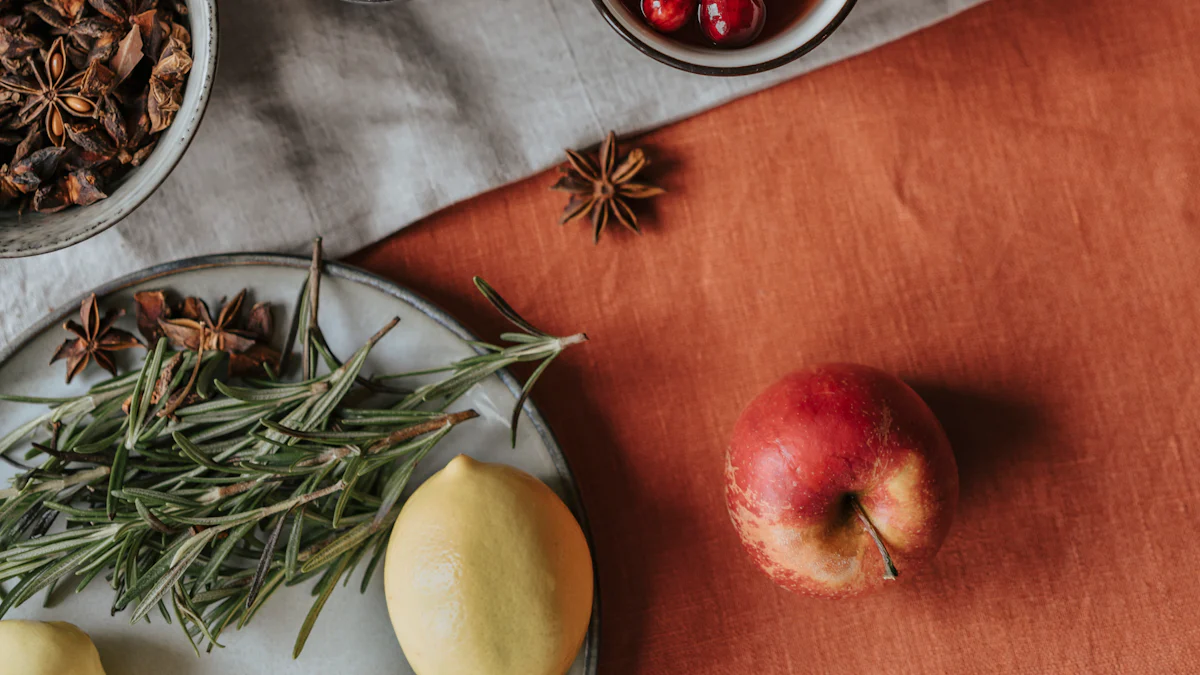
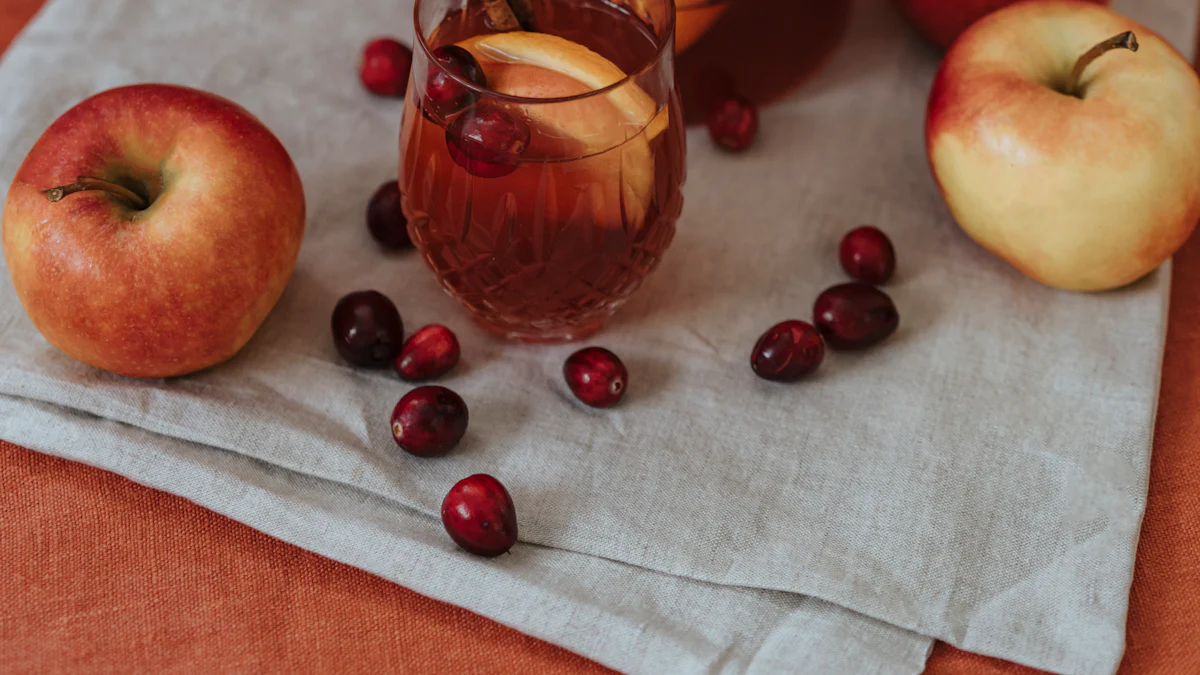
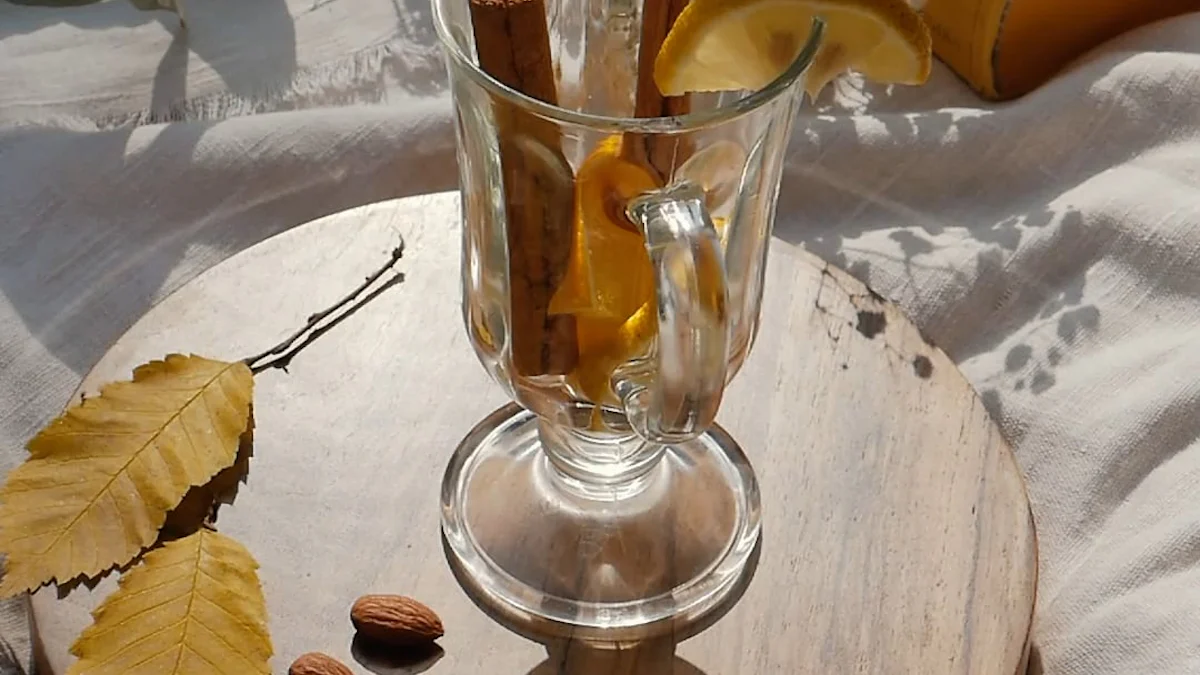
- Optional flavor additions (e.g., spices, fruit, or honey): Personalize your cider with unique flavors. Add cinnamon, cloves, or even fresh fruit like berries. Honey can also add a touch of sweetness and complexity.
With these tools and ingredients, you’re ready to begin your cider-making journey. A cider fermentation kit simplifies the process, making it accessible for beginners and fun for everyone. Gather your supplies, and let’s get started!
Beginner’s Guide to Preparing Your Fermentation Kit
Before you dive into the cider making process, it’s essential to prepare your equipment properly. This step ensures a smooth fermentation journey and helps you avoid common pitfalls. Let’s walk through the preparation process step by step.
Cleaning and Sanitizing Your Equipment
Why sanitization is crucial for preventing contamination
Sanitization is the backbone of successful cider making. Without it, unwanted microorganisms can sneak into your fermentation vessel and ruin your cider. These contaminants can cause off-flavors, unpleasant odors, or even halt the fermentation process entirely. Keeping your equipment clean ensures that only the yeast you add will work its magic on your apple juice.
Scientific Research Findings: Studies from Brau Supply emphasize that poor sanitation can lead to contamination, flavor defects, and spoilage. Preventing contamination is far easier than fixing it later.
Think of sanitization as your first line of defense. By maintaining a clean environment, you set the stage for a flavorful and safe cider fermentation process.
Step-by-step instructions for cleaning and sanitizing tools
Follow these simple steps to clean and sanitize your equipment effectively:
- Rinse everything thoroughly: Start by rinsing all your tools, including the fermentation vessel, airlock, and stopper, with warm water to remove visible dirt or residue.
- Wash with a cleaning solution: Use a non-abrasive cleaning agent designed for brewing equipment. Scrub gently to remove stubborn grime.
- Rinse again: After washing, rinse thoroughly to ensure no soap or cleaner remains.
- Sanitize: Use a food-grade sanitizer to kill any lingering bacteria or wild yeast. Submerge your equipment in the solution or spray it generously.
- Air-dry: Let everything air-dry on a clean surface. Avoid using towels, as they can introduce new contaminants.
By following these steps, you’ll create a clean slate for your cider fermentation kit, reducing the risk of contamination.
Setting Up the Cider Fermentation Kit
Assembling the fermentation vessel and airlock
Once your equipment is sanitized, it’s time to set up your cider fermentation kit. Start with the fermentation vessel, which will house your cider during the fermentation process. Whether you’re using a glass carboy or a plastic bucket, ensure it’s completely dry before assembly.
- Place the stopper securely on the opening of the fermentation vessel.
- Attach the airlock to the stopper. The airlock allows carbon dioxide to escape while keeping oxygen and contaminants out.
- Fill the airlock with water or sanitizer solution to the indicated level. This creates a barrier that protects your cider during fermentation.
Take your time with this step. A properly assembled fermentation vessel ensures a smooth and controlled cider making process.
Preparing apple juice or cider for fermentation
The quality of your apple juice plays a huge role in the final flavor of your cider. Choose fresh, preservative-free juice for the best results. If you’re juicing apples yourself, wash and chop them before extracting the juice.
Here’s how to prepare your juice for fermentation:
- Optional: Add a Campden tablet: This step kills wild yeast and bacteria in the juice. Crush the tablet and stir it into the juice. Let it sit for 24 hours before proceeding.
- Check sugar levels: Use a hydrometer to measure the sugar content of your juice. This helps you estimate the potential alcohol content of your cider.
- Pour into the fermentation vessel: Carefully transfer the juice into the vessel, leaving some space at the top to allow for foam and gas during fermentation.
With your juice prepared and your fermentation vessel ready, you’re all set to begin the exciting cider making process.
How to Make Cider: The Fermentation Process
The fermentation process is where the magic happens. This is the stage where your apple juice transforms into cider, thanks to the hard work of yeast. By following a step-by-step fermentation process, you’ll ensure your cider develops the perfect flavor and alcohol content. Let’s dive into the details.
Starting the Fermentation
Adding yeast to the apple juice
The first step in fermentation is introducing yeast to your prepared apple juice. Yeast acts as the engine of the fermentation process, converting sugars into alcohol and carbon dioxide. For the best results, use hard cider yeast or cider-specific yeast. These strains are designed to enhance the natural flavors of apples while producing a balanced alcohol content.
Here’s how to add yeast:
- Check that your apple juice is at room temperature. Cold juice can slow down yeast activity.
- Sprinkle the yeast evenly over the surface of the juice. If you’re using dry yeast, rehydrate it in warm water (as per the package instructions) before adding it to the juice.
- Stir gently to distribute the yeast throughout the liquid.
Pro Tip: Experimenting with different yeast strains, such as mixing cider yeast with ale yeast, can create unique and complex flavor profiles in your cider.
Mixing and sealing the fermentation vessel
Once the yeast is added, it’s time to seal the fermentation vessel. Proper sealing is crucial to maintain a controlled environment for the fermentation process. Follow these steps:
- Stir the juice gently to ensure the yeast is well-mixed.
- Secure the stopper on the fermentation vessel.
- Attach the airlock to the stopper and fill it with water or sanitizer solution. This setup allows carbon dioxide to escape while keeping oxygen and contaminants out.
With the vessel sealed, place it in a cool, dark location. Maintaining a consistent temperature (ideally between 60-75°F) ensures optimal yeast activity and a smooth fermentation process.
Monitoring the Fermentation Process
Using an airlock to track fermentation activity
The airlock is your window into the fermentation process. As the yeast consumes the sugars in the apple juice, it releases carbon dioxide, which escapes through the airlock. You’ll notice bubbles forming in the airlock within 24-48 hours. This bubbling indicates that fermentation is underway.
Keep an eye on the airlock daily. A steady stream of bubbles means the yeast is actively working. If you don’t see any activity after two days, consider checking the temperature or rehydrating and adding more yeast.
Typical fermentation timeline (10-14 days)
The fermentation process usually takes 10-14 days, depending on factors like temperature, yeast strain, and sugar content. During this time, the yeast will convert most of the sugars into alcohol. The bubbling in the airlock will gradually slow down as the sugar levels decrease.
Fun Fact: Combining sweet, tart, and tannin-rich apples can influence the fermentation timeline and result in a more complex flavor profile.
Signs that fermentation is complete
Knowing when fermentation is complete is key to moving on to the next step. Here are the signs to look for:
- The airlock stops bubbling or shows very minimal activity.
- The cider appears clearer, with sediment settling at the bottom of the vessel.
- A hydrometer reading shows a stable specific gravity over two consecutive days. This indicates that the yeast has consumed all the available sugars.
Once you confirm that fermentation is complete, you’re ready to move on to bottling and carbonation. At this stage, your cider has transformed from simple apple juice into a flavorful beverage. The next steps will refine it further into a drink you can enjoy.
Bottling and Carbonation: How to Make Hard Cider
Once fermentation is complete, it’s time to bottle your cider and add carbonation if desired. This stage transforms your cider into a finished product, ready for storage and enjoyment. Follow these steps to ensure your hard cider is bottled safely and tastes its best.
Preparing for Bottling
Cleaning and sanitizing bottles and caps
Before bottling, clean and sanitize your bottles and caps thoroughly. This step prevents contamination and ensures your cider stays fresh. Here’s how to do it:
- Rinse the bottles and caps: Use warm water to remove any dust or residue.
- Wash with a cleaning solution: Apply a brewing-specific cleaner to scrub the bottles and caps. Avoid regular dish soap, as it can leave behind residues that affect the cider’s flavor.
- Sanitize: Submerge the bottles and caps in a food-grade sanitizer solution. Let them soak for the recommended time on the sanitizer’s instructions.
- Air-dry: Place the bottles upside down on a clean rack to dry completely. Avoid using towels, as they can introduce bacteria.
Pro Tip: Always sanitize your equipment right before use. Even clean bottles can collect dust or microbes over time.
Transferring cider from the fermentation vessel to bottles
Carefully transfer your cider from the fermentation vessel to the bottles. This process, known as racking, helps separate the cider from the sediment at the bottom of the vessel. Use a siphon or racking cane for a smooth transfer:
- Place the fermentation vessel on a raised surface.
- Insert the siphon into the vessel, avoiding the sediment layer.
- Start the siphoning process and direct the cider into the bottles, leaving about an inch of space at the top of each bottle.
Important: Ensure no sugar remains in the cider before bottling. If fermentable sugar is present, it could cause excessive pressure and lead to bottle explosions.
Adding Carbonation to Your Cider
Adding sugar or honey for natural carbonation
If you want sparkling hard cider, add a small amount of sugar or honey to each bottle before sealing. This step, called priming, creates natural carbonation as the remaining yeast ferments the added sugar. Follow these steps:
- Measure about one teaspoon of sugar or honey per bottle. Adjust based on your desired level of carbonation.
- Add the sugar or honey directly to the bottle before filling it with cider.
- Seal the bottle immediately to trap the carbon dioxide produced during this secondary fermentation.
Fun Fact: This method is often referred to as “natural carbonation” and is a traditional way to make hard cider fizzy.
Sealing bottles and storing them for carbonation
After adding sugar or honey, seal the bottles tightly with sanitized caps. Store the bottles in a cool, dark place to allow carbonation to develop. The process typically takes 1-2 weeks, depending on the temperature and sugar content.
Quick Tip: Check the bottles periodically by gently squeezing them. Increased pressure indicates that carbonation is building up.
If you prefer still cider, skip the priming sugar and simply cap the bottles. This method preserves the cider’s natural flavor without adding fizz.
Storing and Enjoying Your Cider
How long to wait before drinking
Patience is key when making hard cider. After bottling, wait at least one week for still cider or two weeks for carbonated cider before opening a bottle. This resting period allows the flavors to mature and the carbonation to stabilize.
Did You Know? The longer you age your cider, the more complex its flavors become. Some cider enthusiasts recommend aging for several months to achieve a richer taste.
Tips for storing cider to maintain quality
Proper storage ensures your cider stays fresh and flavorful. Follow these tips:
- Store bottles upright in a cool, dark place. Light and heat can degrade the cider’s quality.
- Avoid shaking the bottles, as this can disturb the sediment and affect the clarity.
- Refrigerate the cider once it reaches your desired carbonation level. Cold temperatures slow down fermentation and preserve the flavor.
When you’re ready to enjoy your cider, chill it in the fridge and pour it gently into a glass to avoid disturbing the sediment. Whether you’ve created a sparkling or still cider, savor the fruits of your hard cider making kit and your effort.
Final Thought: Bottling and carbonation are the final steps in your cider recipe journey. With care and attention, you’ll create a hard cider that’s uniquely yours.
Troubleshooting Common Issues in Cider-Making
Even with the best preparation, challenges can arise during cider-making. Don’t worry—most issues have simple solutions. Let’s tackle some common problems you might face and how to fix them.
Fermentation Problems
What to do if fermentation doesn’t start
When fermentation doesn’t begin, it can feel frustrating. But this issue is often easy to resolve. Here’s what you can do:
- Check the temperature: Yeast thrives in specific conditions. If your juice is too cold (below 60°F), the yeast may stay dormant. Move your fermentation vessel to a warmer spot, ideally between 60-75°F.
- Rehydrate the yeast: Dry yeast sometimes needs a little help. Dissolve it in warm water (around 95°F) for 10-15 minutes before adding it to the juice. Follow the instructions on the yeast packet for the best results.
- Test the juice: Preservatives in apple juice can inhibit yeast activity. If you suspect preservatives, try using fresh, preservative-free juice.
- Add more yeast: If all else fails, pitch another packet of yeast into the juice. This often jumpstarts the fermentation process.
“Fermentation is a delicate balance of science and art. Understanding yeast behavior helps you troubleshoot effectively.” – Gabe Cook, The Ciderologist
Fixing off-flavors or unusual smells
Sometimes, your cider might develop strange flavors or smells. These issues usually stem from contamination or improper fermentation conditions. Here’s how to address them:
- Sanitize everything: Contamination often causes off-flavors. Always clean and sanitize your equipment thoroughly before use.
- Adjust fermentation temperature: High temperatures (above 75°F) can stress the yeast, leading to unpleasant flavors. Keep your fermentation environment cool and stable.
- Let it age: Some off-flavors mellow out with time. If your cider tastes harsh or sour, let it age for a few weeks before deciding to discard it.
- Use Campden tablets: If wild yeast or bacteria caused the issue, adding Campden tablets can help. These tablets kill unwanted microorganisms without affecting your cider.
Pro Tip: Avoid opening the fermentation vessel frequently. Exposure to oxygen can introduce bacteria and spoil your cider.
Bottling Issues
Preventing bottle explosions during carbonation
Bottle explosions, also known as “bottle bombs,” occur when pressure builds up inside the bottles. This happens if too much sugar remains in the cider or if you add excessive priming sugar. To prevent this:
- Measure sugar carefully: Use a teaspoon or scale to measure the exact amount of sugar or honey for each bottle. Stick to about one teaspoon per 16-ounce bottle.
- Check fermentation completion: Ensure fermentation has fully stopped before bottling. Use a hydrometer to confirm stable readings over two days.
- Store bottles safely: Place bottles in a sturdy box or plastic bin during carbonation. This contains any mess if a bottle does explode.
Quick Tip: Refrigerate your bottles once carbonation reaches the desired level. Cold temperatures slow down yeast activity and reduce the risk of explosions.
Dealing with flat cider
Flat cider can be disappointing, especially if you were aiming for a fizzy drink. Here’s how to troubleshoot:
- Check the yeast: If the yeast is inactive, carbonation won’t occur. Ensure your cider still has live yeast before bottling.
- Add priming sugar: Without sugar, the yeast has nothing to ferment into carbon dioxide. Add the correct amount of sugar or honey to each bottle.
- Store at the right temperature: Yeast needs warmth to work. Keep your bottles in a room-temperature environment (around 70°F) for 1-2 weeks to allow carbonation to develop.
Fun Fact: Flat cider isn’t a failure! Many people enjoy still cider for its smooth and natural flavor. If carbonation doesn’t work out, embrace it as a unique style.
By addressing these common issues, you’ll gain confidence in your cider-making skills. Every challenge is an opportunity to learn and improve. Keep experimenting, and soon you’ll master the art of crafting delicious cider.
Tips for Personalizing Your Cider
Creating cider at home gives you the freedom to experiment and craft a drink that matches your taste. Personalizing your cider can turn a simple beverage into something truly unique. Let’s explore some ways to make your cider stand out.
Experimenting with Flavors
Adding flavors to your cider is one of the easiest ways to make it your own. You can enhance its taste by incorporating spices or fruits.
Adding spices like cinnamon or cloves
Spices can add warmth and depth to your cider. Cinnamon sticks, cloves, or even nutmeg work well, especially if you enjoy seasonal flavors. To infuse these spices:
- Add them directly to the fermentation vessel during the secondary fermentation stage.
- Let them steep for a few days, tasting periodically to ensure the flavor doesn’t overpower the cider.
- Remove the spices once you achieve the desired taste.
“I added cinnamon and cloves to my cider last fall, and it tasted like a cozy autumn evening in a glass!” – Anonymous Brewer
Infusing with fruits like berries or citrus
Fruits can bring a fresh and vibrant twist to your cider. Berries like raspberries or blackberries add a tart sweetness, while citrus fruits like oranges or lemons brighten the flavor. Here’s how to do it:
- Chop the fruit into small pieces to release more juice.
- Add the fruit to the fermentation vessel or steep it in the cider after fermentation.
- Strain the cider before bottling to remove any pulp or seeds.
Experiment with different combinations to discover your favorite blend. For example, a mix of apples and cranberries creates a festive cider perfect for the holidays.
Adjusting Sweetness
Sweetness plays a big role in the overall taste of your cider. You can tweak it to suit your preference, whether you like it dry or sweet.
Back-sweetening with sugar or honey
Back-sweetening involves adding sugar or honey after fermentation. This method works well if you want to control the sweetness without affecting the fermentation process. Follow these steps:
- Stabilize the cider by adding a Campden tablet or potassium sorbate to prevent further fermentation.
- Dissolve sugar or honey in a small amount of warm water.
- Stir the mixture into the cider gradually, tasting as you go.
Pro Tip: Honey not only sweetens but also adds a subtle floral note, enhancing the cider’s complexity.
Using non-fermentable sweeteners for a sweeter cider
Non-fermentable sweeteners like stevia or erythritol are great options if you want to avoid restarting fermentation. These sweeteners don’t break down into alcohol, so they maintain their sweetness. Simply add them to your cider until you reach the desired level of sweetness.
“I tried using stevia in my cider, and it gave me the perfect sweetness without worrying about bottle explosions.” – Anonymous Brewer
Creating Unique Blends
Blending different ingredients can elevate your cider to a whole new level. You can experiment with apple varieties or even mix cider with other beverages.
Mixing apple varieties for different flavor profiles
Using a mix of apple varieties can create a more complex and balanced cider. Sweet apples like Fuji or Gala add natural sugars, while tart apples like Granny Smith provide acidity. Tannin-rich apples, often used in traditional cider-making, contribute astringency and depth.
Fun Fact: Combining sweet, tart, and tannin-rich apples results in a cider with a well-rounded flavor profile.
Combining cider with other beverages (e.g., mead or beer)
For a bold twist, try blending your cider with other beverages. Mixing cider with mead (honey wine) creates a drink called cyser, which has a rich and sweet flavor. Combining cider with beer, especially a light ale, adds a malty undertone.
- Start with a small batch to test the flavor combination.
- Adjust the ratio of cider to the other beverage based on your taste.
“I blended my cider with a pale ale, and the result was a crisp, refreshing drink with a hint of hops.” – Anonymous Brewer
Personalizing your cider is all about creativity and experimentation. Whether you’re adding spices, adjusting sweetness, or creating unique blends, the possibilities are endless. Dive in, try new ideas, and enjoy the process of crafting a cider that’s truly yours!
Safety Tips for Making Cider from Apples
Avoiding Contamination
Importance of proper sanitization
Keeping your cider-making process clean is essential. Contamination can ruin your cider’s flavor and even make it unsafe to drink. Harmful microorganisms, like Escherichia coli and coliforms, can sneak into your cider if you don’t sanitize your equipment properly. Studies from PubMed and Revolution Fermentation highlight that poor sanitation often leads to bacterial contamination and unwanted taste issues.
To avoid this, always clean and sanitize every tool and surface that comes into contact with your cider. This includes fermentation vessels, airlocks, stoppers, and even your hands. Use a trusted food-grade sanitizer, such as Star San or One Step Cleaning Solution, to kill bacteria and wild yeast. These products are effective and safe for brewing.
Here’s a quick checklist to ensure proper sanitization:
- Rinse thoroughly: Remove visible dirt or residue from all equipment.
- Wash with a cleanser: Use a brewing-specific cleaning agent to scrub tools.
- Sanitize: Submerge or spray equipment with a food-grade sanitizer.
- Air-dry: Let everything dry on a clean surface to avoid recontamination.
Scientific Research Findings: According to DIY Hard Cider, thorough cleaning and sanitizing are critical steps to maintain the quality of your cider. Skipping these steps increases the risk of contamination and spoilage.
By prioritizing hygiene, you create a safe environment for fermentation. This ensures your cider develops its intended flavors without interference from unwanted microbes.
Handling Bottles Safely
Preventing over-carbonation and bottle explosions
Bottling your cider is exciting, but it comes with risks if not done carefully. Over-carbonation can lead to dangerous bottle explosions, which not only waste your cider but also pose safety hazards. This happens when too much pressure builds up inside the bottles, often due to excess sugar or incomplete fermentation.
To prevent this, follow these safety tips:
- Ensure fermentation is complete: Use a hydrometer to confirm stable sugar levels over two consecutive days. This ensures the yeast has consumed all fermentable sugars before bottling.
- Measure priming sugar accurately: Add no more than one teaspoon of sugar or honey per 16-ounce bottle. Too much sugar can cause excessive carbonation.
- Use sturdy bottles: Choose bottles designed for carbonation, such as glass beer bottles or swing-top bottles. Avoid thin or weak glass containers.
- Store bottles in a safe place: Place them in a plastic bin or box during carbonation. This contains any mess if a bottle bursts.
Quick Tip: Refrigerate your bottles once carbonation reaches the desired level. Cold temperatures slow down yeast activity, reducing the risk of over-carbonation.
If you’re unsure about carbonation levels, gently squeeze a plastic test bottle filled with your cider. Increased pressure indicates carbonation is building. Once the bottle feels firm, it’s time to refrigerate all your bottles.
Fun Fact: Many cider makers use plastic soda bottles for testing carbonation. These bottles expand as pressure builds, giving you a visual cue to monitor carbonation progress.
By handling bottles with care and precision, you can enjoy a safe and successful cider-making experience.
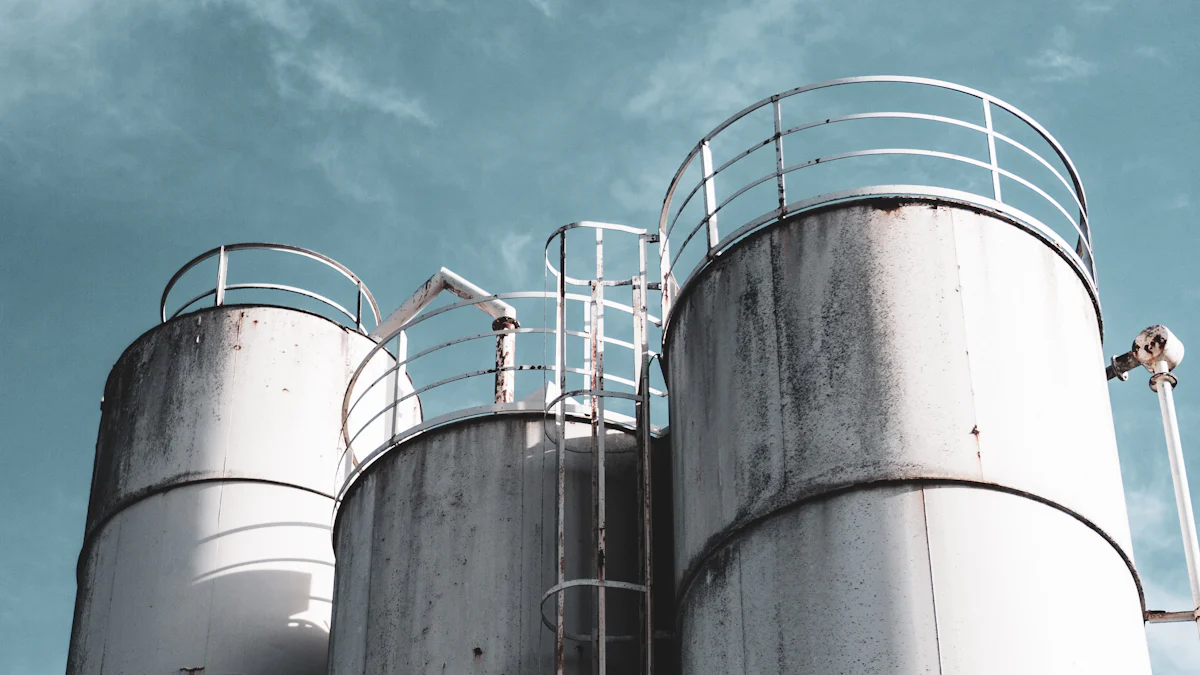
How Chenma Supports Your Cider-Making Journey
Making homemade hard cider can feel like a big task, but having the right support makes all the difference. That’s where Shandong Chenma Machinery Co., Ltd. steps in. With a focus on innovation and quality, Chenma provides everything you need to elevate your cider-making experience. Let’s explore how Chenma’s equipment and expertise can help you craft the perfect cider.
High-Quality Fermentation Equipment
Stainless steel tanks and fermentation vessels
When it comes to fermentation, the equipment you use matters. Chenma offers top-notch stainless steel tanks and fermentation vessels designed to meet the needs of cider makers at every level. These tanks are built to last, ensuring durability and reliability throughout the cider-making process. Stainless steel not only resists corrosion but also maintains the purity of your cider by preventing unwanted flavors from seeping in.
“Stainless steel tanks are the gold standard for fermentation. They’re easy to clean, maintain temperature control, and ensure consistent results.” – Cider Craft Magazine
Whether you’re fermenting a small batch or scaling up production, Chenma’s tanks provide the perfect environment for turning apple juice into delicious homemade hard cider.
Customizable equipment for cider-making needs
Every cider maker has unique goals, and Chenma understands that. That’s why they offer customizable equipment tailored to your specific needs. Want a tank with precise temperature controls? Need a vessel that fits a tight space? Chenma’s talented engineers work with you to design equipment that matches your requirements.
Their ability to adapt products ensures you get exactly what you need to make cider your way. This flexibility makes Chenma a trusted partner for both beginners and seasoned cider makers.
Expertise in Fermentation Processes
Technical support and training for beginners
Starting your homemade hard cider journey can feel overwhelming, especially if you’re new to fermentation. Chenma doesn’t just provide equipment—they also offer technical support and training to guide you through the process. Their team of experts is ready to answer your questions, troubleshoot issues, and share tips to help you succeed.
“Chenma’s support team made all the difference when I started making cider. They explained everything step by step, and now I feel confident in my skills!” – A satisfied homebrewer
With Chenma by your side, you’ll gain the knowledge and confidence to create cider that rivals store-bought options.
Turnkey solutions for homebrewers and professionals
For those looking to take their cider-making to the next level, Chenma offers turnkey solutions. These complete systems include everything you need to streamline the cider-making process, from fermentation to bottling. Whether you’re a homebrewer experimenting with new recipes or a professional scaling up production, Chenma’s solutions save you time and effort.
Their turnkey systems are designed with efficiency in mind, allowing you to focus on crafting the perfect batch of homemade hard cider. With Chenma’s expertise, you can achieve consistent results and enjoy the satisfaction of creating cider that’s uniquely yours.
Chenma’s commitment to quality, innovation, and customer support makes them an invaluable partner for anyone passionate about cider making. Whether you’re just starting out or looking to refine your craft, Chenma has the tools and knowledge to help you succeed.
Making cider with a fermentation kit offers a simple and enjoyable way to create something truly special. You get to combine tradition, science, and creativity into a rewarding experience. Whether you’re using apples from your garden or experimenting with hard cider sweeteners, the process is accessible and fun for everyone. With the right tools and ingredients, you can craft homemade cider that reflects your unique taste. Don’t hesitate to try new flavors and techniques. Enjoy the journey of turning fresh apple juice into a delicious beverage you’ll be proud to share.
FAQ
What are the primary methods of fermenting apple cider?
You can choose from three main methods to ferment apple cider. Each method offers unique benefits and challenges, so your choice depends on your goals and equipment.
- Wild Fermentation: This method relies on natural yeast present in the apples or the environment. It creates complex flavors but offers less control over the process.
- Controlled Fermentation with Commercial Yeast: Using cider-specific or wine yeast gives you more control over the flavor and alcohol content. This method is ideal for beginners.
- Blended Approach: Some cider makers start with wild fermentation and later introduce commercial yeast to balance flavor and control.
Tip: If you’re new to cider-making, start with commercial yeast for consistent results.
When should you do the first racking after primary fermentation?
The first racking usually happens after the primary fermentation, which lasts about 2 to 4 weeks. At this stage, most of the fermentation has occurred, and the cider begins to develop its flavors. Racking helps separate the cider from the sediment (also called lees) at the bottom of the vessel.
To rack your cider:
- Use a siphon or racking cane to transfer the liquid into a clean container.
- Avoid disturbing the sediment to keep your cider clear.
Pro Tip: Racking not only improves clarity but also prevents off-flavors caused by prolonged contact with the sediment.
Can you use any type of apple juice for cider-making?
Not all apple juices work well for cider-making. Always choose fresh, preservative-free juice. Preservatives like potassium sorbate can inhibit yeast activity, preventing fermentation. Unpasteurized juice retains natural flavors and nutrients, making it the best option.
If you’re juicing apples yourself, wash them thoroughly and remove any bruised or rotten parts. A mix of sweet, tart, and tannin-rich apples creates a balanced and flavorful cider.
How do you know when fermentation is complete?
Fermentation is complete when the yeast has consumed all the sugars in the juice. Here are the signs to look for:
- The airlock stops bubbling or shows minimal activity.
- The cider appears clearer, with sediment settling at the bottom.
- A hydrometer reading shows a stable specific gravity over two consecutive days.
Fun Fact: Fermentation typically takes 10-14 days, but factors like temperature and sugar content can affect the timeline.
What should you do if fermentation doesn’t start?
If fermentation doesn’t start within 48 hours, don’t panic. Here’s how to troubleshoot:
- Check the temperature: Ensure the juice is between 60-75°F. Yeast struggles in colder environments.
- Rehydrate the yeast: Dissolve dry yeast in warm water (around 95°F) before adding it to the juice.
- Test the juice: Preservatives in store-bought juice might be the issue. Switch to fresh, preservative-free juice.
- Add more yeast: If all else fails, pitch another packet of yeast to jumpstart fermentation.
Remember: Fermentation is a delicate process, but small adjustments can often fix the problem.
How can you make your cider sweeter?
You can sweeten your cider after fermentation through back-sweetening. Stabilize the cider first by adding a Campden tablet or potassium sorbate to prevent further fermentation. Then, gradually add sugar, honey, or non-fermentable sweeteners like stevia until you reach your desired sweetness.
Quick Tip: Honey not only sweetens but also adds a subtle floral note, enhancing the cider’s complexity.
Is it possible to make sparkling cider at home?
Yes, you can make sparkling cider by adding priming sugar before bottling. The remaining yeast ferments the sugar, producing carbon dioxide, which creates natural carbonation. Add about one teaspoon of sugar per bottle, seal tightly, and store in a cool, dark place for 1-2 weeks.
Caution: Monitor the carbonation process carefully to avoid over-carbonation and bottle explosions.
How long should you age your cider before drinking?
You can drink your cider as soon as one week after bottling for still cider or two weeks for carbonated cider. However, aging your cider for several months enhances its flavor and complexity. Store the bottles in a cool, dark place to allow the cider to mature.
Did You Know? Many cider enthusiasts recommend aging for at least three months to achieve a richer taste.
What’s the best way to avoid contamination during cider-making?
Sanitization is the key to avoiding contamination. Clean and sanitize all equipment, including fermentation vessels, airlocks, and stoppers, before use. Use a food-grade sanitizer like Star San to kill bacteria and wild yeast. Always let your equipment air-dry on a clean surface.
Pro Tip: Avoid opening the fermentation vessel frequently. Exposure to oxygen can introduce bacteria and spoil your cider.
Can you experiment with flavors in cider-making?
Absolutely! Cider-making is a creative process, and experimenting with flavors can make your cider unique. Add spices like cinnamon or cloves during fermentation for warmth. Infuse fruits like berries or citrus for a fresh twist. You can even blend different apple varieties to create a balanced flavor profile.
Fun Fact: Mixing cider with mead creates a drink called cyser, which has a rich and sweet flavor.